These are the instructions for setting up a development environment using the Windows Subsystem for Linux (WSL). We peppered the installation instructions with Check steps that confirm your progress through the steps. Use each to validate a step before moving on. If you hit a snag, stop and reach out (forum, office hours) and we can help you out!
You may need to restart your computer a few times throughout this process, so it’s a good idea to save all work before starting so you can restart when prompted.
Requirements
Confirm that you are running an appropriate version of Windows 10. To find the version number, type winver into the start menu search bar and run the command. A panel appears that reports the version information as shown in this screenshot:
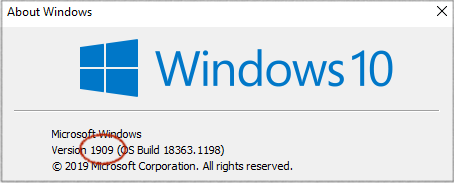
When we updated our installation instructions for Winter Quarter 2021, we tested on Version 1909 of Windows 10 and recommend that your version match ours.
Windows version earlier than 1909 If you are running a Windows version that is earlier 1909; you should not proceed with the installation instructions. Stop here and update to a compatible OS version first. If you need help, reach out to the staff.
Enable WSL and install Ubuntu 20.04
Windows OS does not natively support the development tools used in this course. Enabling WSL (Windows Subsystem for Linux) allows you to run an Ubuntu instance on top of Windows OS. You will install the necessary development tools into the Ubuntu WSL environment and do your coursework there.
Enable WSL Windows feature
- Type "features" into start bar and open the Control panel to "Turn Windows features on or off".
- In the panel, find the checkbox "Windows Subsystem for Linux". Check the box, and click "OK". Wait for it to complete the requested changes and then restart your computer when prompted.
Install Ubuntu 20.04
Ubuntu version 20.04 LTS for WSL is available in the Microsoft Store.
- Open the Microsoft Store app. Search for "Ubuntu 20", select
Ubuntu 20.04 LTSand install it.Be sure to choose version Ubuntu 20.04 LTS The other Ubuntu versions do not support the software requirements we need.
- Once it's done, launch the application. A terminal window will open that says "Installing, this may take a few minutes…".
- Once that command finishes, it prompts you to enter a new username and password for your Ubuntu account. Be sure to remember the name and password, you'll need them later for administrator privileges.
-
Apply the latest Ubuntu updates by running the command below in your WSL terminal window:
$ sudo apt update && sudo apt upgradeDo not be alarmed about the long-winded unix-babble produced – these processes are total chatterboxes.
Check: confirm Ubuntu and WSL version
$ lsb_release -a
No LSB modules are available.
Distributor ID: Ubuntu
Description:    Ubuntu 20.04.1 LTS
Release:        20.04
Codename:       focal
$ powershell.exe "wsl --list --verbose"
  NAME              STATE       VERSION
  Ubuntu-20.04      Running     1
The rightmost column of the last command reports the version of WSL. It is critical that you are using WSL version 1, not 2, as serial port support is not available in WSL2.
You now have an up-to-date version of Ubuntu running in WSL1 on top of your Windows OS.
Accessing WSL files from Windows
An important detail to note about WSL is that it hosts its own file system. The files you access within the WSL terminal are separate from your regular Windows file system. You can access the WSL files in the Windows File Explorer by changing to a particular directory in the WSL terminal and run the command below:
$ explorer.exe .
This command opens a window in File Explorer that shows the files in the current WSL directory (whose shortname name is dot). Windows applications can now access these files, such as to edit a WSL text file using your favorite Windows text editor. Nifty!
Install arm-none-eabi toolchain
We use a cross-compiler toolchain to compile programs for the Raspberry Pi. Run the commands below in your WSL terminal to install the toolchain.
- Download our toolchain package file:
$ wget https://github.com/cs107e/homebrew-cs107e/raw/master/gdb-arm-none-eabi_9.2-0ubuntu1_20.04+10-107e_amd64.deb -
Install the package.
$ sudo apt install -f ./gdb-arm-none-eabi_9.2-0ubuntu1_20.04+10-107e_amd64.deb
Check: confirm compiler
$ apt list gdb-arm-none-eabi
gdb-arm-none-eabi/now 9.2-0ubuntu1~20.04+10-107e amd64 [installed, local]
$ arm-none-eabi-gcc --version
arm-none-eabi-gcc (15:9-20190q4-0ubuntu1) 9.2.1 20191024 [ARM/arm-9-branch revision]
Install Python3 and packages
The rpi-run.py script will be used to send programs from your computer to the Pi. This script uses python3 and two support packages. Run the commands below in your WSL terminal to install these components.
-
Install python3-pip.
$ sudo apt install python3-pip -
Install the pyserial and xmodem packages.
$ python3 -m pip install pyserial xmodemYou may see a warning about the pip version being slightly out of date, this is harmless and can be ignored.
Check: confirm python3 and packages pyserial and xmodem
$ python3 --version
Python 3.8.5
$ python3 -m pip show pyserial xmodem
Name: pyserial
Version: 3.4
... blah blah blah ...
Name: xmodem
Version: 0.4.6
... blah blah blah ...
Your versions may be slightly newer (higher numbers). That's fine!
Install CP2012 console driver
The console driver enables the bootloader client to communicate with the Pi over the USB-serial device.
- The installation of the CP2102 driver is done from Windows (not inside the WSL terminal). Switch to your Windows web browser and go to the Silicon Labs CP210x Downloads page.
- On this page, select the "Downloads" tab and find the link for "CP210x Windows Drivers v6.7.6". Download this zip file.
Be sure to choose version 6.7.6! Don't be confused by other drivers with similar names and slightly different version numbers. The version to download is exactly CP210x Windows Drivers v6.7.6.
- Extract all files from the downloaded zip file. Look in the uncompressed folder for the installer exe file that matches the architecture of your laptop. If your laptop is 64-bit, the installer exe is named
CP210xVCPInstaller_x64.exe. If 32-bit, it isCP210xVCPInstaller_x86.exe.- If you don't know whether your laptop is 32 or 64-bit, use command
dpkg --print-architecturein your WSL terminal and look for a response ofamd64(64-bit) ori386(32-bit).
- If you don't know whether your laptop is 32 or 64-bit, use command
- Run the appropriate installer exe and follow the prompts to completion.
After you have installed the development tools, follow the steps below to configure your user environment.
Create cs107e_home directory
-
Make a new directory named
cs107e_hometo store course material within your home directory. The tilde character~is shorthand for the user's home directory.$ mkdir ~/cs107e_home -
Change to this directory and clone the courseware repository. The courseware repo is used to distribute code and materials for lectures, labs, and assignments.
 $ cd ~/cs107e_home
 $ git clone https://github.com/cs107e/cs107e.github.io
 Cloning into 'cs107e.github.io'...
Check: confirm directory contents
$ ls ~/cs107e_home/cs107e.github.io/cs107e/bin
pinout     rpi-run.py
Note: If you're using WSL, now is a good time to open File Explorer on your cs107e_home directory and "Pin to Quick Access" to add it the sidebar for future use. See accessing WSL files from Windows.
Edit shell configuration file
Next, configure your shell environment to match the location of your cs107e_home directory.
When opening a new shell, the environment is initialized by reading a configuration file in your home directory. Editing the configuration file allows you to set the initial state of your shell.
- Determine the name of the configuration file for your shell. The name depends on which shell you are using. Use the command
echo $SHELLto see your shell. Your shell is likelybash, although it might bezshif using a more recent macOS.$ echo $SHELL /bin/bashIf your shell is
bash, the configuration file is named.bashrc. If your shell iszsh, the configuration file is named.zshrc. For any other shell, please contact a CA for help. - Find out if you already have an existing configuration file or create it if needed. Change to your home directory and list the files. Filenames starting with a dot are hidden in a directory listing by default. Use the command
ls -ato list all files, including hidden ones:$ cd ~ $ ls -a . .bash_history .bashrc cs107e_home .python_history .. .bash_logout .config .profile .viminfo(The filenames listed in your directory may be somewhat different, don't worry!) Look through list to see if there is already a configuration file for your shell. If not listed, use
touchto create an empty file with the appropriate name:$ touch .bashrc - Open the configuration file in a text editor and append the following two lines verbatim:
 export CS107E=~/cs107e_home/cs107e.github.io/cs107e
 export PATH=$PATH:$CS107E/bin
The first line sets the environment variable
CS107Eto the path to where the class files are stored. The second line adds ourbinsubdirectory to your executable path. - Use the
sourcecommand to read the updated configuration file into your current shell:$ source ~/.bashrc
Check: confirm current shell is properly configured
$ echo $CS107E
/Users/student/cs107e_home/cs107e.github.io/cs107e
$ ls $CS107E/lib/libpi.a
/Users/student/cs107e_home/cs107e.github.io/cs107e/lib/libpi.a
$ which pinout
/Users/student/cs107e_home/cs107e.github.io/cs107e/bin/pinout
The configuration file is persistent and should be automatically read when creating a new shell in the future.
Check: confirm shell configuration is persistent and future shells properly configured
Close your current shell and open a new one. Repeat the check step above in the new shell and confirm the new shell is also properly configured.
If you confirm your configuration is persistent, skip Step 5 below. If it is not persistent and you are using bash and macOS Terminal, use the additional customization in Step 5 to add persistence.
- (only if needed) Find the file named
.bash_profilein your home directory. If no such file exists, use thetouchcommand to create an empty file with that name. Open that file in a text editor and append the following line verbatim:source ~/.bashrc
Repeat the previous check step with a new shell to confirm your configuration is now persistent.
Configure git identity
We distribute course materials as git repos and you will use git to access, manage, and submit your work.
-
The commands below will properly set the identity recorded with your git actions. Be sure to replace
My Nameand[email protected]with your own name and address.$ git config --global user.name "My Name" $ git config --global user.email [email protected]
Check: confirm your git identity
$ git config --get-regexp user
user.name My Name
user.email [email protected]
Installation complete
Use the Final check steps to confirm your entire environment.