Written by Philip Levis, updated by Julie Zelenski
Due: Tuesday, February 21 at 5:00 pm
$ make run
rpi-run.py -p uart_shell.bin
Found serial device: /dev/cu.SLAB_USBtoUART
Sending `uart_shell.bin` (22128 bytes): .........................................................................
Successfully sent!

Welcome to the CS107E reference shell.
Remember to type on your PS/2 keyboard!
Pi> help
   help [cmd]               print command usage and description
   echo [args]              print arguments
   reboot                   reboot the Raspberry Pi
   peek [addr]              print contents of memory at address
   poke [addr] [val]        store value into memory at address
Pi> help reboot
   reboot                   reboot the Raspberry Pi
Pi> echo cs107e rocks my sox
cs107e rocks my sox
Pi> echo I can use poke to turn on the green ACT LED!
I can use poke to turn on the green ACT LED!
Pi> poke 0x20200020 0x8000
Goals
For this week’s assignment, you will implement a PS/2 keyboard driver and implement a simple command-line shell. You will then be able to type commands and execute them on your Pi. Neat!
In completing this assignment you will have:
- written code that interfaces with an input device. When you next download a device driver, you will think "I have a decent idea how that code operates",
- seen the design of a complex interface into hierarchical levels and appreciated its benefits,
- implemented a simple command-line interpreter, and
- explored the use of C function pointers for callbacks and command dispatch.
This is a fun assignment, and brings us back to using physical devices and making them do cool things. These additions are the first steps toward turning your humble little Raspberry Pi into a standalone personal computer.
Get starter files
Do a git pull in your $CS107E repository to ensure the courseware files are up to date.
$ cd $CS107E
$ git pull
Now cd to your local mycode repo and pull in the assignment starter code:
$ cd ~/cs107e_home/mycode
$ git checkout dev
$ git pull --allow-unrelated-histories starter-code assign5-starter
In the assign5 directory, you will find these files:
-
ps2.c,keyboard.c,shell.c: library modules -
test_keyboard_shell.c: test program with your unit tests -
uart_shell.c: application program that runs your shell, reading input from the PS/2 keyboard and printing output to the uart. You will use this program unchanged. -
Makefile: rules to build uart_shell application (make run) and unit test program (make test) -
README.md: edit this text file to communicate with us about your submission
The make run target builds and runs the sample application
uart_shell.bin. You can use this target to test the full integration of
your ps2, keyboard, and shell modules. The make test target builds and run
the test program test_keyboard_shell.bin. This test program is where
you will add all of your unit tests. You will make heavy use of this target
throughout your development.
You can edit MY_MODULE_SOURCES in the Makefile to choose which modules of yours to build on. (See instructions for use of MY_MODULE_SOURCES in assignment 3.)
Core functionality
PS/2 Keyboard driver
1) Review interface (ps2.h and keyboard.h)
The PS/2 keyboard driver is divided over the two modules ps2 and keyboard.
Start by reviewing the header files (available in $CS107E/include or browse
here). The functions of the ps2 module are:
ps2_device_t *ps2_new(unsigned int clock_gpio, unsigned int data_gpio)unsigned char ps2_read(ps2_device_t *dev)
And keyboard functions:
void keyboard_init(unsigned int clock_gpio, unsigned int data_gpio)unsigned char keyboard_read_next(void)key_event_t keyboard_read_event(void)key_action_t keyboard_read_sequence(void)unsigned char keyboard_read_scancode(void)
The design of the keyboard driver is worth a pause to understand and
appreciate. All of the nitty-gritty low-level protocol details are encapsulated
within the ps2 module. The keyboard module layers on that to implement the
logic to process scancodes into sequences, events, and typed characters. Within
the keyboard module, the functionality is arranged hierarchically, each routine
building on the next. The bottom level routine reads a raw scancode (by
delegating to the ps2 module), the next level gathers a sequence of scancodes
into one logical key action, the higher level routines translate those actions
into key events and typed characters.
The layered interface cleanly supports the needs of different clients. A client
that simply wants typed characters might use only the top level
keyboard_read_next; a client that reacts to key up and down events would instead access
the mid level keyboard_read_event.
The hierarchical design also eases the job of the implementer. Each level focuses on a discrete part of the operation and delegates tasks above and below to other functions. This makes each function simpler to implement and test. Your implementation plan of attack is to start at the bottom and work your way upward.
2) Read and validate scancodes (ps2 module)
The ps2 module encapsulates functionality for interacting with a PS/2 device.
Read over the ps2.h header file. The ps2.c module has only two functions: ps2_new and ps2_read.
Review the given code for the ps2_new function in the ps.c file. Take care to understand how it
initializes the device and configures the gpio pins.
The struct ps2_device tracks the state
associated with a single PS/2 device. The struct as defined in the starter code has
just two fields (clock and data gpio numbers). If you later encounter a need to track
additional state, simply add new fields to the struct and initialize those fields in ps2_new.
In lab 5, you got a start on implementing ps2_read function. Copy that work
into ps2.c now. The entire PS/2 protocol rests on this cornerstone, so your
first task is to finish it off and ensure it is reliable and robust.
A PS/2 scancode is an 11-bit packet organized in 8-odd-1 format. The first bit,
the start bit, is low. The next 8 bits are data bits, least significant bit
first. The following bit is a parity bit. The PS/2 protocol uses odd parity,
which means that there should be an odd number of 1s among the data and parity
bits. The 11th and final bit is the stop bit, which is always high.
The return value from ps2_read is the 8 data bits.
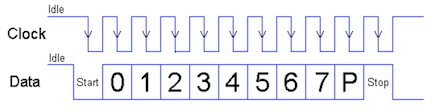
Timing is everything! The timing of the PS/2 protocol has to be strictly followed. The keyboard sends the bits rapid-fire and you must catch each bit as it arrives. Once your driver sees the falling clock edge for the start bit, it needs to stay on task to read each subsequent bit. There is not time between clock edges to complete a call to a complex function like printf. Save any debug printing for after you read the entire sequence.
The ps2_read function reads one well-formed scancode.
"Well-formed" means that the start, parity, and stop bit each have valid values.
If ps2_read encounters an invalid bit, it should abandon
the partial scancode and retry, reading the next bit as the start of a new scancode. Discard as many invalid attempts as necessary, only returning when a full valid scancode is received.
Review the given code in keyboard.c for the functions keyboard_init and keyboard_read_scancode
and confirm you understand how the keyboard uses a ps2 device to obtain scancodes. The first test in test_keyboard_shell.c will read and echo scancodes as read by the keyboard. Use
this test to verify your basic scancode functionality.
3) Gather sequence into key action (keyboard_read_sequence)
The next level function keyboard_read_sequence in keyboard.c gathers a sequence of
scancodes into one logical key action. A key action is the press or release of
a single key.
When you press a key, the PS/2 keyboard sends the scancode for that key. When
you release the key, it sends a two-byte sequence: 0xF0 (the "break" code)
followed by the key's scancode. For example, typing z will cause the keyboard
to send 0x1A and releasing z will cause the keyboard to send 0xF0,
0x1A.
The press or release of an extended key sends a sequence with the extra byte
0xE0 inserted at the front. For example, pressing the right Control key sends
the sequence 0xE0, 0x14 and releasing sends 0xE0, 0xF0, 0x14.
Review keyboard.h for the description of the function keyboard_read_sequence and the definition of the type key_action_t. Implement the function to read the sequence (1, 2 or 3 bytes
depending on context) and translate it into a key_action_t struct which
reports the type of action and which key was involved.
Use the test in test_keyboard_shell.c that reads sequences to verify the
operation of this function before moving on.
4) Process key events (keyboard_read_event)
The mid level routine keyboard_read_event processes key actions into key
events. It calls keyboard_read_sequence to get a key_action_t and packages
the action into a key_event_t struct which includes the state of keyboard
modifiers and the PS/2 key that was acted upon.
There are some additional types and constants used by this function. Review keyboard.h for the definitions of keyboard_modifiers_t and key_event_t and ps2_keys.h for
the definition of ps2_key_t and keycode constants.
The modifiers field of a key_event_t reports which modifier keys are in
effect. The state of all modifier keys is compactly represented using a bit
set. The keyboard_modifiers_t enumeration type designates a particular bit
for each modifier key. If a bit is set in modifiers, this indicates the
corresponding modifier key is currently held down or in the active state. If
the bit is clear, it indicates the modifier is inactive.
The PS/2 protocol does not provide a way to ask the keyboard which modifiers are active, instead your driver must track the modifier state itself. A simple approach is a static variable in your keyboard module that you update in response to modifier key actions. The Shift, Control, and Alt modifiers are active if and only if the corresponding modifier key is currently held down. Caps Lock operates differently in that its setting is "sticky". A press of the Caps Lock key makes the modifier active and that state persists even after releasing the key. A subsequent press of Caps Lock inverts the state of the modifier.
To associate each key with the characters it can produce, we provide an
array to use as a lookup table. Review the definition of the ps2_keys array
in the source file $CS107E/src/ps2_keys.c ( ps2_keys.c) The array is indexed by scancode.
The array element at each index is a struct. For example, the A key
generates scancode 0x1C. The array element ps2_keys[0x1c] holds the struct
{'a', 'A'} which is the unmodified and modified character produced by this
key.
Review keyboard.h for the description of the function keyboard_read_event. Implement the function as described. Use the functions in test_keyboard_shell.c to verify your processing of key
events before moving on.
5) Produce ASCII characters (keyboard_read_next)
You now have all of the pieces needed to implement the final top-level routine
keyboard_read_next. This function calls keyboard_read_event to get the
next key press event and produces the character corresponding to the key that
was typed.
The return value is the ASCII character produced by an ordinary key or a value
designated for a special key such as Escape or F9. The character produced by a
key is determined by its ps2_key_t entry in the lookup table.
A ps2_key_t has two fields for each key, ch and other_ch, which
correspond to the unmodified and modified character produced by the key. The
A key produces { 'a', 'A' }. The Four key produces { '4', '$' }.
Keys such as Tab that are unchanged by the modifier have the same character
for ch and other_ch, e.g. {'\t', '\t'}.
The keyboard diagram below shows which keys your keyboard driver is required to handle. Keys not shown in this diagram, e.g. numeric keypad, arrow keys, home, scroll lock, etc., are not required.
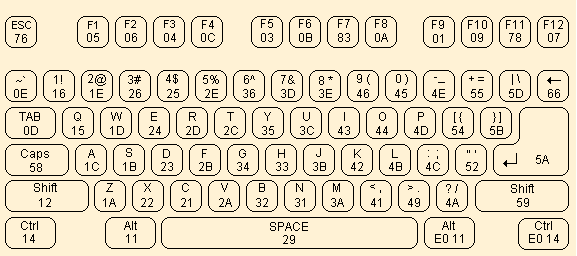
Typing an ordinary key produces an ASCII character. The ordinary keys are:
- All letters, digits, and punctuation keys
- Whitespace keys (Space, Tab, Return)
- Backspace (Delete,←,⌫) produces
'\b'(ASCII backspace)
Typing a special key produces its designated value. These values are greater than 0x90 to distinguish from ASCII values. The special keys are:
- Escape
- Function keys F1-F12
Press or release of a modifier key changes the event modifiers. No character or code is produced. The modifier keys are:
- Shift, Caps Lock, Alt, Control
A change in modifiers can affect the character produced by future typed keys.
The keyboard translation layer does not produce modified characters based on
state of Alt or Control, only for Shift and Caps Lock. When the Shift modifier
is active, other_ch is produced when typing a key that has an other_ch
entry. If Caps Lock is active, other_ch is produced only for the alphabetic
keys. Caps Lock has no effect on digits, punctuation, and other keys. If Shift
and Caps Lock applied together, Shift "wins", e.g. other_ch is produced.
(Caps Lock and Shift together do not invert letters to lowercase).
If you are using a Mac, Keyboard Viewer is a handy tool for visualizing the character produced for a given key combination. Try it out! If you are still unsure how to handle a particular case, experiment with our reference implementation of the keyboard using the test application from lab.
Review keyboard.h for the description of the function keyboard_read_next. Implement the function as described. Use the functions in test_keyboard_shell.c to test.
Congratulations, you have completed your keyboard driver!
Simple shell
With a keyboard as input device, your Pi has gone interactive. The simple shell application allows the user to enter commands and control the Pi without needing to work through another computer.
The video below demonstrates of our reference shell. The user is typing on a PS/2 keyboard connected to the Pi and the shell output is displaying over uart to a Mac laptop.
1) Review shell interface and starter code
A shell, such as bash or zsh, is a program that operates as a command-line
interpreter. The program sits in a loop, reading a command typed by the user
and then executing it.
The starter code for shell_run demonstrates the standard read-eval-print loop
that is at the heart of an interpreter. Here it is in pseudocode:
loop forever
    display prompt
    read line of input from user
    evaluate command (parse and execute)
The public functions you will implement in shell are:
void shell_readline(char buf[], size_t bufsize)int shell_evaluate(const char *line)
The shell_readline function reads a command typed by the user. The
shell_evaluate executes that command. Review the documentation for these
operations in the header file shell.h.
The client can configure the input and output for the shell. The shell_init
function takes two function pointer arguments to be supplied by the client,
one for input and one for output. Whenever the shell wants to read the next
character entered by the user, it calls the client's input function. When it
needs to display output, it calls the client's output function.
The apps/uart_shell.c application program initializes the shell with
shell_init(keyboard_read_next, printf); this call configures the shell to
read characters from the PS/2 keyboard and send output to the serial uart
interface.
The shell stores the client's input function pointer in the static variable
shell_read and the output function into the variable shell_printf.
Thereafter the shell calls shell_read whenever it needs to read input from
the user and calls shell_printf whenever it needs to write output. This
applies to all shell output, whether it be the shell prompt, displaying the
result from a command, or responding with an error message to an invalid
request.
When testing your shell in assignment 5, you will likely always use
keyboard_read_next as the input function and printf as the output, but the
flexibility you are building in now lays the groundwork for different choices
in the future. In assignment 6, you'll write a console_printf function that
draws to a HDMI monitor. With a change of one argument in the call to
shell_init(keyboard_read_next, console_printf) your shell will display output
on the graphical console instead of writing to the uart — nifty!
2) Read line
shell_readline calls shell_read to read a character entered by the user and gathers the line of input into a buffer. The user indicates the end of the line by typing Return (\n).
Handling backspace adds a slight twist. When the user types Backspace (\b),
the shell deletes the last character typed on the current line. Removing it
from the buffer is simple enough, but how to un-display it? If you output a
backspace character, e.g. shell_printf("%c", '\b') , it moves the cursor
backwards one position. If you back up, output a space, and then back up again,
you will have effectively "erased" a character. (Wacky, but it works!)
There are two error conditions that shell_readline should detect:
- disallow typing more characters than fit in the buffer
- disallow backspacing through the shell prompt or to previous line
Reject the attempt and call the provided shell_bell function to get an audio/visual beep.
shell_readline is a great way to exercise your shiny new keyboard driver!
3) Parse command line
shell_evaluate first takes the line entered by the user and parses it into a
command and arguments. The parsing job is all about string manipulation, which
is right up your alley after assign 3.
- Divide the line into an array of tokens. A token consists of a sequence of non-space chars.
- Ignore/skip all whitespace in between tokens as well as leading and trailing whitespace. Whitespace includes space, tab, and newline.
- The first token is the name of the command to execute, the subsequent tokens are the arguments to the command.
When tokenizing, be sure to take advantage of the functions you
implemented in your strings and malloc modules. They will be helpful!
4) Execute command
Now that you have the command name and arguments, you're ready to evaluate it.
- Look up the function pointer for the command by name. The command table associates a command name string with its function pointer.
- If no matching command is found, output message
error: no such command 'binky'.and return a nonzero result.
- If no matching command is found, output message
- Call the function pointer, passing the array of tokens and the count of tokens. The first element in the array is the command name, the subsequent elements are the arguments to the command.
- The return value of the command is used as the return value for
shell_evaluate.
There is a command table started in shell.c. You will modify the table as you add commands. Each entry in the table is a command_t struct. A command function pointer takes two parameters: argv is an array of char *, i.e. an array of strings, and argc is the count of elements in the argv array. A command function returns an int to indicate success or failure. The result is 0 if the command executed successfully, or nonzero otherwise.
Your shell has five commands:
int cmd_echo (int argc, const char *argv[])int cmd_help (int argc, const char *argv[])int cmd_reboot (int argc, const char *argv[])int cmd_peek (int argc, const char *argv[])int cmd_poke (int argc, const char *argv[])
Be sure to carefully review the documentation in shell_commands.h. This header file gives example use of each command, including the required error handling and expected output.
The starter code provides a working implementation of cmd_echo as an example. The echo command simply prints its arguments:
Pi> echo Hello, world!
Hello, world!
The additional commands you are to implement are:
-
help
With no arguments,
helpprints the usage and description for all available commands:Pi> help cmd1_usage cmd1_description cmd2_usage cmd2_description ...If an argument is given,
helpprints the usage and description for that command, or an error message if the command doesn't exist:Pi> help reboot reboot reboot the Raspberry Pi Pi> help please error: no such command 'please' -
reboot
The
rebootcommand resets your Pi. It first sends auart_putchar(EOT)to end communication with your latop, then calls thepi_rebootfunction from thepimodule oflibpi. See ya back at the bootloader! -
peek
The
peekcommand prints the 4-byte value stored at memory addressaddr.Below we use
peekto read address0x8000, the memory location of the start of the text section. The first instruction of_startismov sp, #0x8000000, encoded ase3a0d302.Pi> peek 0x8000 0x00008000: e3a0d302Hint: the
strtonumfunction from your strings module will be handy for converting strings to numbers. If the address argument is missing or cannot be converted,peekprints an error message:Pi> peek error: peek expects 1 argument [addr] Pi> peek bob error: peek cannot convert 'bob'Recall that the ARM architecture is not keen to load/store on an unaligned address. A 4-byte value can only be read starting from an address that is a multiple of 4. If the user asks to peek (or poke) at an unaligned address, respond with an error message:
Pi> peek 7
error: peek address must be 4-byte aligned
To test
peek, try a location of an encoded instruction in the text section or a global variable in the data section. Usearm-none-eabi-nm uart_shell.elfto get symbol addresses. You can also use the location for the system timer or gpioFSELorLEVregisters to read values of a peripheral register. -
poke
The
pokecommand storesvalinto the memory at locationaddr.Below is an example using
poketo write at address0x8000. (This memory location stores the first instruction of your program. Since that code has already executed and will not be re-entered, we can overwrite it without causing problems for the executing program):Pi> peek 0x8000 0x00008000: e3a0d302 Pi> poke 0x8000 1 Pi> peek 0x8000 0x00008000: 00000001 Pi> poke 0x8000 0 Pi> peek 0x8000 0x00008000: 00000000If an argument is missing or invalid,
pokeprints an error message:Pi> poke 0x8000 error: poke expects 2 arguments [addr] and [val] Pi> poke 0x8000 wilma error: poke cannot convert 'wilma'You can now turn a GPIO pin on and off by entering shell commands!
Pi> poke 0x20200010 0x200000
Pi> poke 0x20200020 0x8000
Pi> poke 0x2020002C 0x8000
Review the BCM2835 manual to see what is stored at these addresses. What do the above commands do? Hint: the ACT LED on the Pi is GPIO pin 47.
Take care when testing poke. Unlike
peekwhich can read from any address without causing harm,pokeis writing to the address and changing the contents of live memory. Depending on what you are changing, this could interfere with the executing program. Before youpokean address, figure out what is stored there and what effect your update will have. Once you have testedpokeon a few carefully selected addresses, it is reasonable to extrapolate that it will also handle the rest without testing on every single address from 0 to 2^32. 😅Check out the Wikipedia article on peek and poke if you're curious to learn about their historical origins.
Shell output When writing a shell command, be sure that all output is made through
shell_printfand aim for your output to exactly match the format and wording of the output and error messages given above. We know this request is nitpicky, but this enables automated comparison of shell output which translates to fewer staff hours going into manual grading and more time to hang out with y'all in office hours. Your graders thank you in advance!
Testing and debugging
As usual, the effort you put into writing good tests will be evaluated along with your code submission. An interactive program such as this one adds new challenges for testing. Your inventive solutions to overcoming these challenges are welcome!
The given code in test_keyboard_shell.c program has functions that test each
layer of the keyboard module. These functions simply echo the data returned by
the keyboard module. You must manually verify the correctness of the output.
The test_keyboard_assert function demonstrates an example approach for an
assert-based test where you coordinate with the user to provide the keyboard
input.
The shell module is intended to be run interactively and does not lend itself
well to assert-based testing. This doesn't mean you should eschew testing it,
but you will have to be more creative in how you proceed. It may help to
testing shell_evaluate separately from shell_readline. Try calling
shell_evaluate on a fixed command and manually observe that the output is as
expected.
The function shell_readline can get messy if trying to test your shell and
keyboard at same time. There is some sample code in test_keyboard_shell.c
that demonstrates a testing function that returns the next character from a
fixed sequence. This function can be used as input function for the shell in
place of keyboard_read_next as a way to test shell_readline independent of
keyboard.
Extension: editing and history
The extension consists of two parts. You should do both parts.
-
Command-line editing
Implement the left and right arrow keys to move the cursor within the current line and allow inserting and deleting characters at the point of the cursor. What other editing features might be nice to have: Ctrl-a and Ctrl-e to move the cursor to the first and last character of the line? Ctrl-u to delete the entire line? Implement your favorite vim/emacs/editor must-haves!
-
Command history
Number the commands entered starting from 1 and maintain a rolling history of the last 10 commands entered. Change the prompt to include the command number of the current line. Add a
historycommand that displays the history of recent commands, each prefixed with its command number. See the example below:[1] Pi> help echo echo print arguments [2] Pi> echo cs107e rocks cs107e rocks [3] Pi> history 1 help echo 2 echo cs107e rocks 3 historyImplement the up and down arrow keys to access commands from the history. Typing the up arrow key changes the current line to display the command from the history that is previous to the one on the current line. Typing a down array changes the current line to display the command that ran after the one on the current line, or whatever the user had typed until he/she typed up. Use the
shell_beepwhen the user tries to move beyond either end of the history.What other history features might be handy?
!!to repeat the last command?!zeto repeat the most recent command matching the specified prefixze?If you didn't already know that your regular shell includes editing and history features like these, now is a great time to pick up a few new tricks to help boost your productivity!
What other extended features would supercharge your shell and make it your own? Our reference shell throws in a few cute add-ons such as gpio to turn on and off gpio pins and a simple calculator. If you wrote the disassemble extension for assign3 (or you want to do it now!), a nifty option is to integrate a disassemble [addr] command into your shell. What about adding tab to auto-complete command names to save your overworked fingers? The sky's the limit!
To submit the extension for grading, tag with assign5-extension. In your README.md for assign5, list all of the editing features and extra shell commands supported by your fancy extended shell so we'll know how to try it out when grading.
Submitting
The deliverables for assign5-submit are:
- implementations of the
ps2.ckeyboard.candshell.clibrary modules - comprehensive tests for all modules in
test_keyboard_shell.c -
README.md(possibly empty)
Submit your finished code by commit, tag assign5-submit, push to remote, and ensure you have an open pull request. The steps to follow are given in the git workflow guide.
Grading
To grade this assignment, we will:
- Verify that your submission builds correctly, with no warnings. Clean build always!
- Run automated tests on your
ps2,keyboardandshellmodules-
Take care! Our automated testing requires that your shell has absolute consistency in calling
shell_printffor all shell output. Double-check that you are compliant. Be sure to remove or comment out all use ofprintfand debugging output.
-
Take care! Our automated testing requires that your shell has absolute consistency in calling
- Go over the test cases you added to
test_keyboard_shell.cand evaluate for thoughtfulness and completeness in coverage. - Review your code and provide feedback on your design and style choices.
Our highest priority tests will focus on the core features for this assignment:
- Essential functionality of your library modules
- ps2
- read well-formed scancode
- discard malformed (wrong start/stop/parity) and restart
- keyboard
- read events from all keys
- handling of modifiers, including caps lock
- shell
- user-entered input
- handling of backspace
- will not test: backspace through tab character (tab is converted to variable number of spaces behind your back, you don't need to account for this)
- parse and execute command
- ps2
The additional tests of lower priority will examine less critical features, edge cases, and robustness. Make sure you thoroughly tested for a variety of scenarios!
